Window security is often overlooked until it’s too late. Wired window alarm sensors form the backbone of a reliable home security system, running silently 24/7 to detect unauthorized entry. Unlike wireless sensors that rely on batteries and can experience connectivity hiccups, wired sensors deliver consistent, dependable monitoring through hardwired connections to your main alarm panel. Whether you’re retrofitting an older home or building a new one, understanding how wired window alarm sensors work will help you make informed decisions about protecting your family and belongings. This guide walks you through the essentials, from how they function to installation basics and maintenance.
Table of Contents
ToggleKey Takeaways
- Wired window alarm sensors use magnetic contact switches to detect unauthorized entry through hardwired connections, eliminating battery replacement and wireless connectivity issues that plague wireless alternatives.
- The two main types of wired window alarm sensors are magnetic contact sensors ($15–$40) for detecting open/closed windows and glass break detectors ($40–$80) for sensing forced entry through glass.
- Installation of wired window alarm sensors is a beginner-friendly DIY project requiring only basic tools, low-voltage wire, and verification that local building codes don’t mandate permits.
- Wired sensors integrate seamlessly with professional 24/7 monitoring services and provide long-term cost savings by eliminating the ongoing battery replacements required by wireless systems.
- Regular maintenance—including checking magnet alignment, cleaning contacts quarterly, and inspecting wiring for damage—keeps wired window alarm sensors operating reliably for years with minimal effort.
What Are Wired Window Alarm Sensors and How Do They Work?
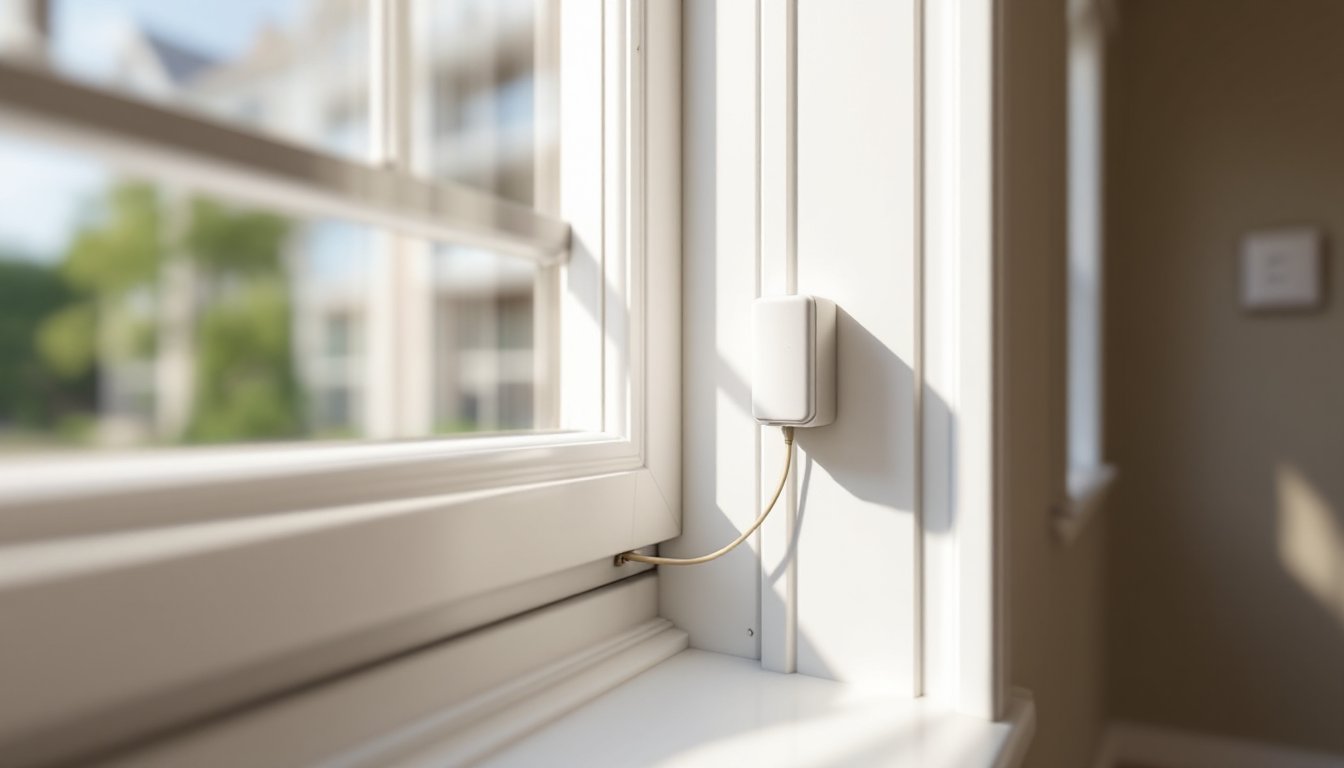
Wired window alarm sensors are hardwired devices that detect when a window opens or closes. They connect directly to your alarm panel via low-voltage wiring (typically 18 or 22 gauge wire), eliminating the need for batteries and ensuring constant communication with your system.
The most common type uses a magnetic contact switch. This consists of two parts: a magnet mounted on the moving sash or frame, and a switch (called a reed switch) mounted on the stationary part of the window. When the window closes, the magnet aligns with the switch, keeping the circuit intact. The moment someone opens the window, the magnet separates from the switch, breaking the circuit and triggering an alert at your panel. It’s simple, reliable, and has been the industry standard for decades.
Wired sensors connect to your alarm panel through concealed wiring run behind walls, under baseboards, or through conduit. This hidden routing protects wires from damage and keeps your home looking clean. Because they’re hardwired, there’s no battery to replace, no signal to drop, and no monthly monitoring fees tied to wireless replacement sensors. The Wired Home Alarm System: The Ultimate Guide to Unmatched Security covers comprehensive system architecture in greater detail.
Key Advantages of Wired Sensors for Your Home Security System
Reliability is the biggest win with wired sensors. No batteries mean no dead sensors silently failing months after installation. No wireless interference means no dropped signals from WiFi routers, microwaves, or neighboring networks. Your sensor either works or it doesn’t, there’s nothing in between.
Wired systems are also cost-effective long term. While initial installation requires running wire through walls (and possibly pulling permits in some jurisdictions), you’ll never buy replacement batteries. A single wired sensor can outlast ten wireless units when you factor in battery replacement and eventual wireless module failures.
They’re ideal for new construction or major renovations where walls are already open. Running low-voltage wiring during framing is straightforward and inexpensive compared to adding it later. Even in existing homes, running wire through attics or basements minimizes cutting into finished walls. Older homes benefit especially, many built before wireless technology are already designed with conduit runs that can repurposed for alarm wiring.
Wired sensors also integrate seamlessly with professional monitoring services. Subscription-based monitoring relies on a hardwired connection between your panel and the monitoring center, making wired sensors the natural choice for comprehensive 24/7 protection. Resources like Tom’s Guide’s window sensor reviews provide detailed comparisons of modern options.
Types of Wired Window Alarm Sensors Available
Magnetic Contact Sensors
Magnetic contact sensors are the workhorses of home security. They’re simple, proven, and inexpensive, typically $15–$40 per unit depending on quality and size. The sensor consists of a small rectangular plastic housing with a switch inside and a separate magnet.
Standard models fit most window types: double-hung, casement, sliding, and fixed panes. The switch mounts on the fixed frame, and the magnet attaches to the moving sash. When installed correctly, there’s a small gap (usually ½ inch or less) required between magnet and switch for reliable operation. Most quality sensors tolerate gaps up to 1 inch, giving you flexibility if the window frame isn’t perfectly aligned.
For larger windows or sliding patio doors, you’ll find longer versions with extended wire leads. Recessed models fit into routed channels in the frame for a nearly invisible installation, ideal if you’re concerned about aesthetics. Surface-mounted versions are faster to install and work fine if the window molding allows good magnet-to-switch alignment.
One limitation: magnetic sensors only detect open-or-closed. They won’t alert you if someone cuts through the glass or forces the frame without moving the sash. That’s where the second type comes in.
Glass Break Detectors
Glass break detectors are wired sensors that listen for the sound of breaking glass. They mount near a window (typically on the ceiling or wall within 6–8 feet of the glass) and use an acoustic sensor to detect the specific frequency of breaking glass while ignoring everyday noise.
These are essential for ground-floor windows, sliding glass doors, and any window that’s difficult to reach with a magnetic sensor. A glass break detector doesn’t replace a magnetic contact, you should use both for full coverage. The magnet catches someone opening the window quietly: the glass detector catches forced entry.
Wired glass break detectors typically cost $40–$80 and connect to the alarm panel just like contact sensors. They’re more complex to test (you can’t just break glass to verify they work), so most come with a test function activated by holding a small magnet to a hidden test button. Read the manual carefully before installation to understand the sensitivity settings, some allow adjustment so you avoid nuisance alarms from slamming car doors or distant glass breaking.
Installation and Setup Considerations for DIY Projects
Installing wired sensors is a beginner-friendly project if you’re comfortable running low-voltage wire and making simple connections at the panel. Here’s what you need to know before starting.
Planning and permits: Check your local building code. Many jurisdictions don’t require permits for low-voltage alarm wiring, but some do. A quick call to your building department answers this in five minutes and saves headaches later. Low-voltage wiring (24V or less) is also safer to handle than line voltage, so you’re unlikely to need a licensed electrician, but confirm locally.
Tools and materials: You’ll need 18 or 22 gauge stranded wire (22 gauge is standard for most sensors), wire staples or conduit, a screwdriver, a wire stripper, and possibly a drill or fish tape if running wire through walls. For surface installation, adhesive-backed wire clips work fine. For cleaner routing, plastic conduit is inexpensive and hides wire while protecting it from damage. Home centers stock pre-made alarm wire kits with multiple conductor gauges and pre-stripped ends, these save time and reduce errors.
Magnet sensor installation: Mount the switch on the stationary frame and the magnet on the moving sash. Use the adhesive backing if the surfaces are clean and dry, or small screws (which come with most sensors) for permanent mounting. Test the gap with the window closed, the magnet should be ¼ to ½ inch from the switch for reliable operation. Slide the window open and closed to verify smooth travel and consistent contact.
Wiring to the panel: Most alarm panels have numbered zones for each sensor. Connect the two wires from each sensor to the corresponding zone terminals on the panel. The polarity rarely matters for basic sensors, but check your panel’s manual, some advanced setups do care. Secure wire with staples every 16–24 inches (about the width of a wall stud) and keep it away from electrical outlets and light switches.
Testing: After connecting each sensor, open and close the window while watching the panel display. It should show the zone as “open” when the window opens and “closed” when it closes. Don’t move on to the next window until you’ve verified the first one works. Refer to CNET’s guide to window sensors for additional product comparison.
Maintenance and Troubleshooting Tips
Wired sensors are low-maintenance once installed, but a few simple checks will keep them working reliably.
Keep magnet and switch aligned: Over time, window frames can shift slightly from settling or seasonal wood movement. If a sensor starts reporting false alarms or intermittent signals, open and close the window while watching the magnet’s position. Loosen the mounting screws and adjust the magnet until it lines up squarely with the switch as the window closes.
Clean contacts: Dust, pet hair, or pollen can accumulate around the magnet and switch, reducing contact reliability. A gentle wipe with a dry cloth every six months prevents this. Don’t use solvents, they can damage the plastic housing.
Inspect wiring: Visually check wire runs for damage, especially in areas with foot traffic or near sharp edges. Rodents can chew through wire insulation in attics and basements. If you find damage, cut out the damaged section and splice the wire with butt connectors rated for low voltage, then secure with electrical tape.
Test quarterly: Press the test button on your panel once a quarter and open each window in sequence. Your panel should register each zone opening and closing. This catches dead sensors before an actual breach occurs.
Address false alarms: If a sensor triggers when it shouldn’t, first rule out magnet misalignment (covered above). If you’ve added furniture or decor near a window, check whether something metal is interfering with the magnet. Refrigerators, heating vents, or computer equipment near windows can cause erratic behavior. Move the sensor or the interference source by at least two feet and retest.
Professional monitoring integration: If you subscribe to professional monitoring, the monitoring center can run diagnostic tests on your wired system remotely. They’ll alert you to weak signals or malfunctioning zones, use these reports to prioritize maintenance. Most reputable monitoring services include annual system checks as part of their contract.
Final Thoughts: Building a Window Security Foundation
Wired window alarm sensors are a proven, affordable way to secure your home without the complications of wireless batteries and connectivity. Whether you install them yourself or hire a professional, they provide the foundation for a dependable security system. Start with magnetic contact sensors on ground-floor windows and areas with easy exterior access, add glass break detectors for sliding doors and hard-to-reach panes, and test regularly. A well-maintained wired sensor system will protect your home for years with virtually zero ongoing maintenance, something no wireless alternative can match.